
Buttermilk Fried Chicken Recipe
These buttermilk fried chicken legs come out juicy on the inside and incredibly crispy on the outside thanks to a simple double dredge. With just a handful of ingredients and beginner-friendly steps, this recipe delivers tender drumsticks and thighs with that classic fried chicken crunch you crave.
Servings: 8 people
Calories: 530kcal
Equipment
- Baking Sheet
- Dutch Oven or Deep Fryer
- Deep Fry Oil Thermometer
Ingredients
- 1 cup buttermilk *
- 2 cups all-purpose flour
- 2 tablespoons kosher salt
- 1 tablespoon ground black pepper
- ½ tablespoon garlic powder
- 2 teaspoons onion powder
- 1 teaspoon ground paprika
- ½ teaspoon ground cayenne pepper optional
- 4 pounds bone-in, skin-on chicken thighs and drumsticks **
- 2 quarts cooking Oil for frying***
Instructions
- Pour the buttermilk into one large bowl. In a second large bowl, mix together the flour, kosher salt, black pepper, garlic powder, onion powder, ground paprika, and cayenne pepper (optional).1 cup buttermilk, 2 cups all-purpose flour, 2 tablespoons kosher salt, 1 tablespoon ground black pepper, ½ tablespoon garlic powder, 2 teaspoons onion powder, 1 teaspoon ground paprika, ½ teaspoon ground cayenne pepper

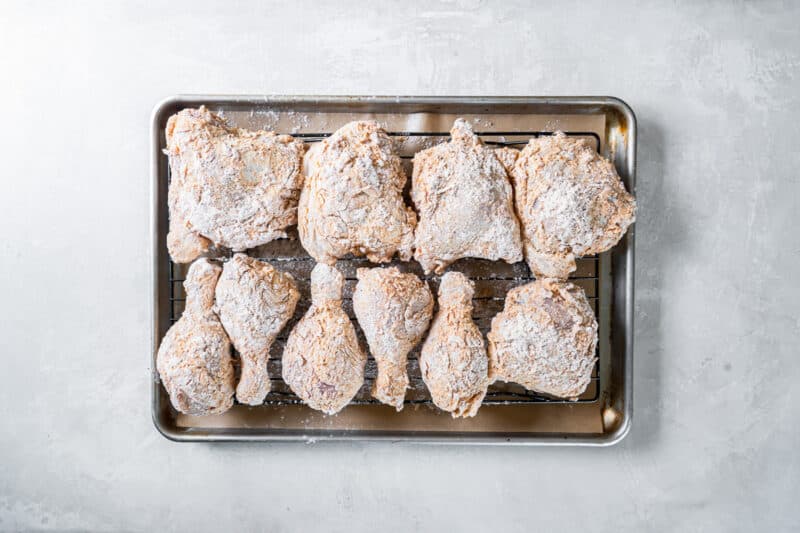
- One piece at a time, dust the chicken thighs and drumsticks with the seasoned flour, then dip into the buttermilk. Dredge the chicken back in the flour mixture, making sure it’s thoroughly coated. Place the coated chicken pieces on a baking sheet, and cover them with wax paper, allowing them to rest until the flour coating is pasty, about 20-40 minutes.4 pounds bone-in, skin-on chicken thighs and drumsticks

- While the chicken is resting, preheat the cooking oil, in either a heavy pot on the stove or a deep fryer, to 375℉.2 quarts cooking Oil
- Fry the chicken in batches until golden brown and cooked through, about 7-8 minutes on each side.

- Remove and drain the chicken on a wire rack or paper towels before serving.

Video
Notes
*If you don't have buttermilk, measure out 1 cup of milk, remove a tablespoon, and stir in a tablespoon of lemon juice or white vinegar. Let sit for 5 minutes before using.
**This method works for any cut, but I prefer dark meat since it's more forgiving/harder to overcook, and it usually turns out juicier.
***Use a neutral, high smoke point cooking oil for frying. Canola oil and vegetable oil work great!
Tips:
- When coating the chicken, try to keep a "wet" hand and a "dry" hand. This will prevent sticky hands!
- Shake off excess flour to prevent clumps in the oil while you fry.
- Let the chicken rest once you've coated it in the flour mixture. This allows the crust to set and will help it stay on while frying!
- The cooking oil should register at 375°F before adding the chicken. I like to use a thermometer to maintain that temp throughout frying.
- Don't add too many chicken pieces to the oil. Overcrowding the pan can cause the oil temperature to drop too low, making the chicken soggy and not crispy.
- Use tongs to place the chicken in the hot oil and also to turn it while cooking. This will prevent splattering.
- Pull the chicken when it reaches 160°F internally to avoid overcooking. The temperature will rise another 5-10°F as it rests.
- Let the fried chicken rest on a wire rack set over a baking sheet or on a paper towel for about 5 minutes to help any excess oil drip off. I prefer a wire rack because the airflow around the chicken prevents the crust from going soggy.
- Skim any flour clumps from the oil between batches to prevent a "burnt" taste in your chicken.
Nutrition
Serving: 1serving | Calories: 530kcal | Carbohydrates: 27g | Protein: 33g | Fat: 31g | Saturated Fat: 8g | Polyunsaturated Fat: 9g | Monounsaturated Fat: 11g | Trans Fat: 0.2g | Cholesterol: 119mg | Sodium: 281mg | Potassium: 394mg | Fiber: 1g | Sugar: 2g | Vitamin A: 445IU | Vitamin C: 3mg | Calcium: 63mg | Iron: 3mg